23 Canned Food Storage Ideas for 2026
Canned goods have a way of taking over a shelf before you even notice. A few tins turn into a crowded row, and the ones pushed to the back quietly disappear from sight.
Then you end up buying another can of beans because you forgot you already had three sitting behind the soup. It is a small annoyance, but it slowly turns a pantry into a jumble.
The fix does not need a huge pantry or expensive organizers. A simple storage system lets you see every can, reach it easily, and keep track of what you actually own.
Below are 23 clever canned food storage ideas that keep tins neat, visible, and easy to grab.
Let’s jump in!
How Can You Build a Simple Canned Food Storage System at Home?
Start by giving all your canned food one home — a pantry shelf, a cabinet, or a small rack tucked in a corner. When everything lives in one spot, you always know what you have.
Next, group similar cans together. Put beans or sauces in their own area, soups in another, and vegetables in a third. Finding what you need gets much easier once like goes with like.
Save this article for later! 👇👇

Then think vertical. A simple tiered shelf or stackable rack lets you see every can instead of hiding rows behind each other.
Gravity Feed
Clutter disappears fast once cans start rolling on their own. A gravity-feed rack loads new cans from the top while the older ones roll down to the front, so the next can slides into place the moment you take one out.
Building one at home takes little more than a small wooden frame and two angled rails sized for standard cans.
Set it on a pantry shelf or in a cupboard where vertical space usually goes to waste.
It shines in kitchen corners, packing plenty of cans into a small footprint while keeping every label visible and within reach.

Photo credit: @pawpawridge
Tiered Racks
A cabinet full of hidden cans turns every meal into a guessing game. Tiered racks fix that by lifting each row slightly above the one in front, so labels stay readable.
Soup, beans, or sauces take seconds to find instead of a rummage through stacked tins.
These slim metal racks suit bottom cabinets with limited headroom. Put heavier cans on the bottom row and lighter ones up top to keep the whole thing steady.
Deep cupboards benefit most — stepped rows stop cans from getting lost at the back.
One small organizer can turn a messy shelf into a pantry you can scan at a glance.

Photo credit: @housegoals_tt
Floor Racks
The floor of a pantry often holds more storage than it looks. Low wire racks turn that empty strip into a tidy can zone where rows stay straight and easy to reach.
Angled shelves let cans roll forward as you take one, so the next is always waiting at the front.
Slim racks slide neatly under wall shelves without blocking the walkway. Heavy items — soups, tomatoes, sauces — sit happily on the lower levels, steady and visible.
Wide pantry rooms get the most from this setup: line up several racks side by side and you get a neat, shop-like wall of bulk cans.
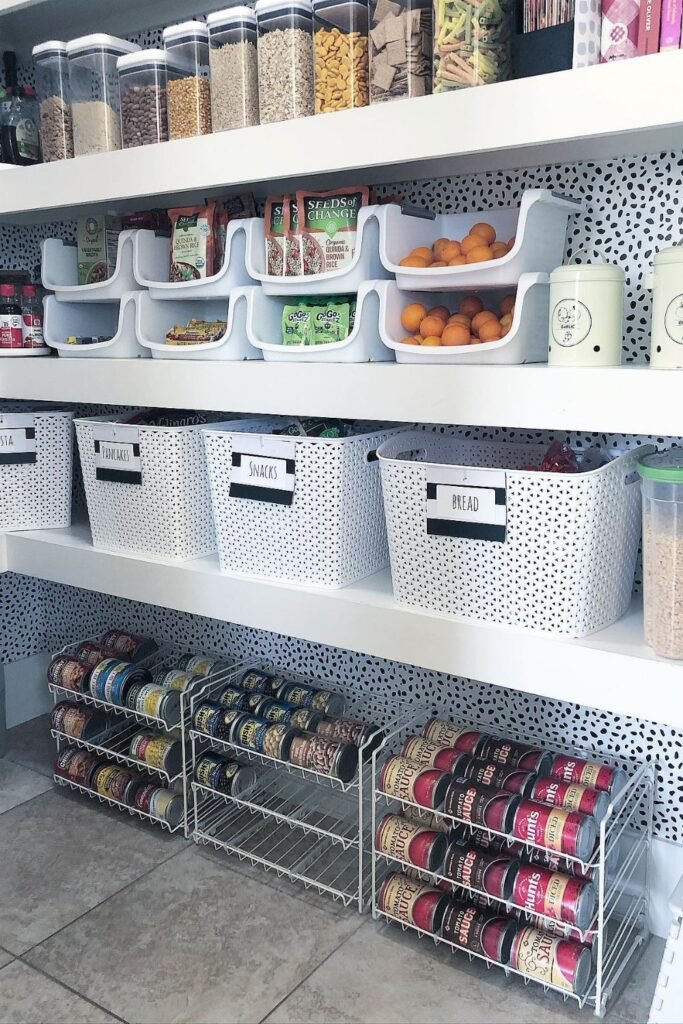
Photo credit: @sortedsimplicity
Corner Pantry
Dead corners waste some of the best pantry space. Curved corner shelves turn that awkward spot into a smooth flow where cans are visible from every angle.
Rounded shelves suit canned soups, sauces, and vegetables, since the rows follow the curve instead of being pushed into a dark corner.
Making it work usually means adding custom corner shelves or curved inserts to an existing cabinet.
Pantry rooms gain the most, because corner walls can hold several levels without blocking movement.
Restocking stays simple too: newer cans slide to the back while older ones stay at the front, easy to grab.

Photo credit: @extraspace
Can Zones
Mixed cans turn pantry shelves into clutter fast. Clear “can zones” keep everything easy to find and restock.
Give canned food one shelf and sort by type — tomatoes together, beans in their own row, soups in a separate section.
Little rows of similar cans also make it easy to see how much you have left before grocery day.
Deep pantry shelves suit this best, since they hold more than one row without looking crowded.
Leave a little room behind each group so new cans can move to the back while older ones stay in front.

Photo credit: @thehomeedit
Drawer Dividers
Deep kitchen drawers often become a dumping ground where cans roll around and vanish behind other things.
Wooden dividers turn that mess into neat sections that keep everything upright and easy to reach.
Sort by type: canned soups in one compartment, sauces in another, smaller tins in a third.
Pull the drawer open and everything is on show — no more digging through stacked shelves.
Wide lower cabinets work best, since the drawers pull all the way out and give you full access.

Photo credit: @sortandstore
Clear Bins
Cans vanish quickly on deep pantry shelves. Clear bins solve that by keeping everything in visible rows while still containing the clutter.
Put soups in one bin, vegetables in another, beans or fruit in the next, and slide the bin forward to reveal every label at once — no toppled stacks.
Acrylic containers work especially well: you can see what is inside at a glance, and they stop cans rolling around.
Long pantry shelves are ideal, letting you line up plenty of bins side by side into ordered zones.
Restocking is easy too — fresh cans go to the back of the bin, older ones stay at the front, ready to use.

Photo credit: @thehomeedit
Shelf Glides
Rolling cans across a shelf creates more mess than storage. Wire shelf glides fix that by guiding each row into its own lane.
Instead of spreading out, cans stay in a line, which makes it far easier to see what is there.
Add glide dividers to a regular pantry shelf and give each lane a different food — beans, soups, vegetables, or sauces.
Wider pantry shelves suit this best, since several lanes can sit side by side without wasting space.
Restocking follows the same rhythm: newer cans move to the back, older ones stay at the front where they get used first.

Photo credit: @qualityhomemesquite
Pantry Wall
Empty wall space beside the kitchen is often wasted storage waiting to happen. Turn that wall into a full pantry station and you instantly gain room for jars, canned goods, and everyday cooking staples.
Open wooden shelves keep everything visible, while lower pull-out drawers handle heavier pantry items like fruits, vegetables, and bulk goods.
Rows of mason jars look good on the upper shelves, and it is simple to see what is inside and read the labels.
This works best in narrow kitchen corners or on unused walls, since vertical shelving builds a full pantry without needing more cabinets.
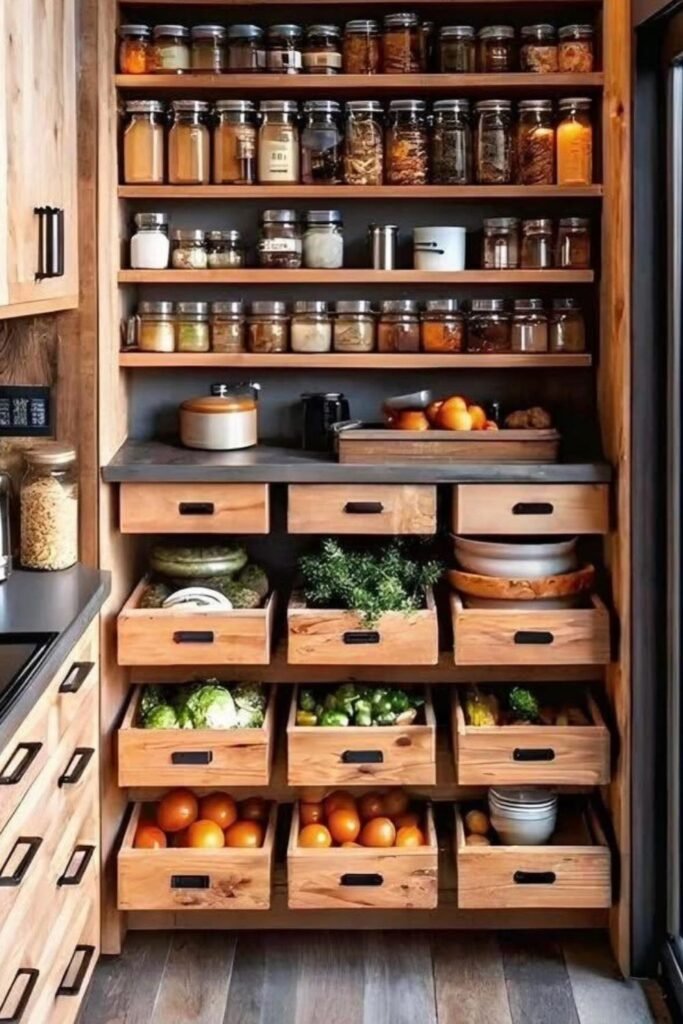
Photo credit: @andrea_arredo
U-Pantry
Pantry space becomes far more useful once shelves wrap around the room instead of sitting on one wall.
A U-shaped layout makes it easy to organize by category, keeping canned food within reach from all sides.
One wall can hold canned vegetables, another soups and sauces, while the drawers in the middle store snacks or smaller pantry goods.
Continuous shelving also stops cans from stacking too high, so labels stay easy to see and scan.
This setup suits small walk-in pantries best, making the most of wall space without crowding the floor.

Photo credit: @ladylanes
Door Shelves
Pantry doors often hide one of the best storage spots in the kitchen. Mounting wire shelves on the inside of the door adds extra layers for light pantry items without using up shelf space.
These narrow racks hold boxed meals, seasoning packets, small jars, and even slim cans.
The moment the door opens, every tier is on view, which makes grabbing quick ingredients much faster.
Door shelving helps small pantries most, adding vertical storage where cabinet space is short.
Fitting it usually takes just an over-the-door rack or a basket system that screws to the door.

Photo credit: @neatlydesigned
Lazy Turntable
Corner shelves hide jars behind each other until half the contents get forgotten. A rotating turntable fixes that instantly — one spin brings everything forward.
Put sauces, nut butters, canned spreads, or tiny jars on the tray so nothing gets trapped at the back of the shelf.
A quick spin shows all the labels without moving anything else.
Compact cabinets benefit most, since a turntable uses tight shelf space well and keeps things easy to reach.
Acrylic or plastic trays are the best pick: light, easy to clean, and simple to wipe down.
One small spinning tray can turn an overstuffed shelf into a grab-and-go spot for everyday pantry items.

Photo credit: @socoprivate
Jar Wall
A wall of mason jars turns food storage into a working pantry display. Long wooden shelves hold dozens of jars in clear rows, so each ingredient is easy to find.
Every food type — dry goods, canned vegetables, sauces, preserved foods — gets its own row, which makes the whole system simple to maintain.
Strong hardwood shelves matter here, because full jars get heavy over time.
This works best in kitchens with an empty wall or a large pantry area, since vertical space holds far more food than regular cabinets.
Restocking stays easy with neat rows: new jars slip to the back, older ones stay in front, ready to use.

Photo credit: @henmade_homestead
Pull Cabinets
Cabinet space often hides more storage than it seems. Pull-out pantry cabinets unlock it by sliding forward and revealing several narrow shelves at once.
The middle can hold jars, sauces, or condiments, while each side panel carries rows of canned items.
Sliding racks suit deep base cabinets where things tend to vanish at the back. Smooth glides bring the whole unit forward, so you can reach every can without bending down or digging.
If your kitchen lacks pantry space, a single cabinet can hold dozens of products while staying orderly and easy to see.

Photo credit: @starmarkcabinetry
Pantry Lighting
Good lighting can change how a pantry works. Shelves full of canned food become much easier to manage once every label is clearly visible.
Soft LED strip lights along the sides of the shelves brighten the whole room, letting you scan rows of cans without dragging everything forward.
Wooden pantry shelves pair well with this setup, since the light bounces softly off each level.
Tall pantry cabinets benefit most, because deeper shelves usually hide things at the back.
Narrow LED strips or motion lights give a clean glow that makes finding ingredients quicker, whether you are cooking or refilling groceries.
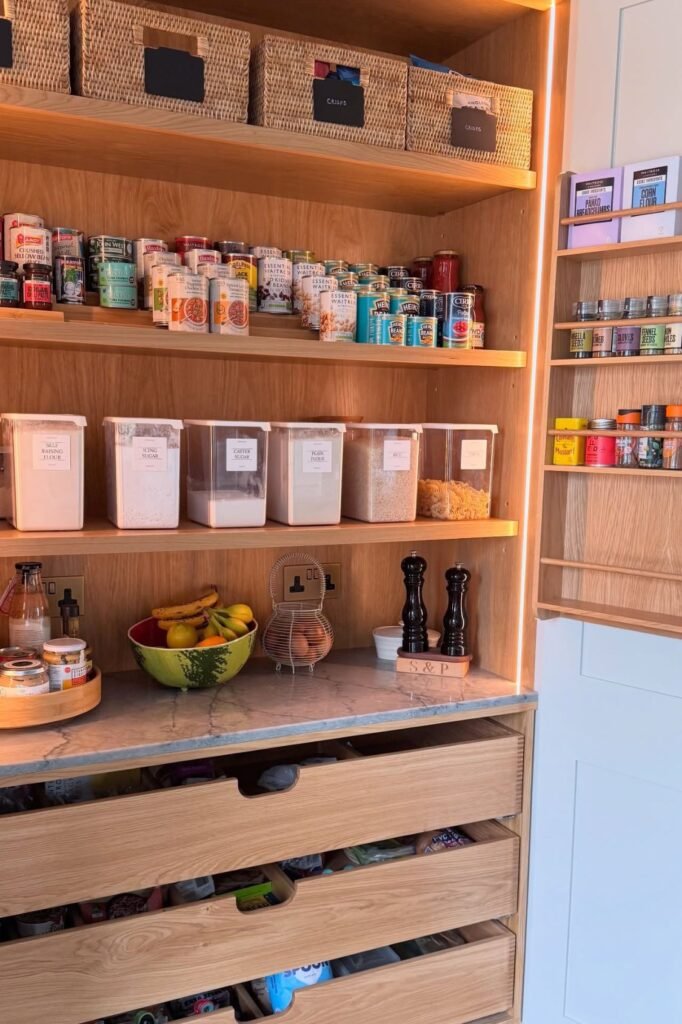
Photo credit: @home.edited
Can Drawer
Hidden cans pile up fast when they are stored at the back of cabinets. A deep pull-out drawer changes that by laying cans flat in neat rows where every label is easy to see.
Slide the drawer open and all your supplies are on show at once, which makes grabbing items while cooking much faster.
Clear organizers inside the drawer keep everything in its own section — tomatoes in one, corn or beans in another, small cartons in their own lane.
This works best with lower kitchen cabinets, because the drawers open all the way and bring everything to the front.
At home, simple acrylic trays or adjustable dividers set up the same system, keeping canned goods stable and easy to restock.

Photo credit: @fromhousetohome__
Sliding Baskets
Deep cabinets hide food faster than you would think. Sliding wire baskets bring everything forward so canned goods stop getting lost at the back.
Each basket works like its own drawer — pull it out and you can see every can at once.
Sorting into groups works even better: tomatoes in one basket, soups in another, fruit or beans in their own row.
Metal gliding racks are great for bottom cabinets, where shelves tend to turn messy.
Pull-out basket kits that attach to cabinet rails make fitting easy. Once set up, every can is within reach without bending or digging through piles.

Photo credit: @simplybetterhome
Slat Shelves
Home canning fills cabinets fast, and standard shelves rarely keep up. Wide wooden slat shelves create long rows where jars sit safely without slipping forward.
Each board acts like a little wall, keeping jars in line while still letting you read the labels.
This design suits garages, basements, or big pantry rooms where you need to store a lot.
Strong wood is essential, since glass jars get heavier over time.
Run several horizontal slats across a wall and you quickly build a sturdy storage wall that can hold hundreds of jars — and makes checking and rotating them easy as fresh ones are added.

Photo credit: @littlehouseliving
Pantry Display
Open shelving makes pantry organization much easier when every item stays visible. Rows of canned food along eye-level shelves let you scan quickly while cooking or restocking.
Sauces in one row and vegetables in another keep the shelves from turning into a jumbled mess.
Clear containers above and beside the cans help too, keeping dry goods separate from canned goods.
This style suits walk-in pantries best, since wide shelves give you room to spread things out instead of stacking them.
With enough space between rows, labels stay easy to see, which makes finding items quicker and keeps the cupboard looking neat and clean.

Photo credit: @thehomeedit
Shelf Risers
Crowded cabinets get much easier to manage once shelves gain a second level. Wooden risers lift the back row of cans so labels stay visible instead of hiding behind the front line.
Two levels automatically double the usable space without adding more shelves.
The top tier suits smaller canned goods, sauces, or condensed milk, while the bottom tier is perfect for bigger jars.
Stacked risers work best in narrow pantry cabinets, keeping things orderly without spreading them across several shelves.
Simple wooden or acrylic risers sit right on top of an existing shelf, creating a clear layered pattern where every can is easy to see and reach.

Photo credit: @thehomeedit
Category Shelves
Searching for one can in a mixed pantry wastes time every single day. Category shelves fix that by giving each food type its own section.
Beans in one row, soups in another, vegetables in a third — nothing gets lost in a pile.
Grouping similar cans together also makes food shopping easier, since you can see at a glance what is running low.
Pantry cubbies or large shelves suit this best, because they naturally divide goods into sections.
Once the categories are set, restocking is simple: new cans go in the back, older ones stay in front, ready to use.

Photo credit: @thebaerminimalist
Stack Towers
Limited shelf space can still hold a surprising number of cans when vertical stacking is used wisely.
Little can towers stack several items in the footprint of one can, keeping everything easy to grab and neatly together.
Put taller cans at the bottom and lighter or smaller cans on top to keep the stack sturdy.
This method works best on strong shelves in cabinets with enough height but not enough width.
Kitchen cupboards with extra headroom are ideal, because stacking stops cans from spreading out across the whole shelf.

Photo credit: @kingtoysst
Cubby Storage
Large pantry walls become much easier to manage when divided into small cubbies. Each compartment naturally creates its own storage zone, stopping canned items from taking over the whole shelf.
Put soups in one cubby, vegetables in another, and sauces in a third, so everything has a defined place.
Small bins inside the cubbies keep similar cans together and stop them from sliding forward.
This style works best for tall pantry cabinets, because stacked cubbies add storage without making shelves too deep.
Once categories are chosen, restocking is easy: slide new cans to the back of the cubby and leave the older ones at the front, ready to use.

Photo credit: @thehomeedit
FAQs
How do you organize canned food so nothing expires in the back?
Every time you restock, put older cans in front and newer cans at the back. This simple rotation helps you use food up before it goes bad.
Tiered shelves, pull-out drawers, or can dispensers also keep all the labels visible, so it is much easier to see what you already have.
Grouping cans — soups, beans, vegetables, or sauces — stops duplicates and makes meal planning easier.
What is the best place to store canned food in a kitchen?
The ideal spot is a shelf in a cool, dry pantry. Heat shortens the shelf life of cans, so keep them away from ovens, dishwashers, and direct sunlight.
Canned foods stay fresh in cabinets, pantry shelves, or pull-out drawers kept between 50°F and 70°F.
Visibility matters too — use bins, racks, or organizers that keep labels easy to see.
You may like to read!

One Comment