Grinch Cookies

Grinch cookies are bright green, soft, chewy, and finished with a single red heart — and they are one of the most fun cookies you can bake in December. They start with a simple sugar cookie dough, tinted a vivid green with food coloring gel, rolled in powdered sugar so they bake up with a crinkled, snowy coating, and topped with a red heart sprinkle that sits right in the center like the Grinch’s heart growing three sizes. They look like they belong at a themed party, but they taste like a proper cookie: buttery, sweet, soft in the middle, with crisp edges and a gentle vanilla flavor.
I make these every year for a holiday movie night, when the table is full of green treats and someone has put the Grinch movie on for the tenth time. Kids love the color and the heart, and adults love that the cookies are not just a novelty — they are genuinely good. The crinkle coating is the part people ask about. It comes from rolling the dough balls in powdered sugar before baking, and as the cookies spread in the oven, the coating cracks into a pattern that looks like snow on green hills. It is easy, it is pretty, and it takes no special skill at all.
What I like most is how simple the dough is. It is a basic sugar cookie dough with a few extra steps: green coloring, a chill, a roll in powdered sugar, and a heart on top. There is no piping, no frosting, and no decorating skill needed. If you can roll a ball of dough, you can make these cookies. And because the dough chills well, you can make it ahead, bake a batch when guests are coming, and have warm cookies on the table in fifteen minutes.
Recipe at a Glance
- Servings: about 30 cookies
- Prep time: 20 minutes, plus 30 minutes chilling
- Bake time: 10 to 12 minutes per batch
- Total time: about 1 hour 15 minutes
- Serve: warm or at room temperature, with cold milk or hot cocoa
Why This Recipe Works
The dough is a butter sugar cookie dough, and the butter is doing most of the flavor work. Creaming the butter and sugar together for two to three minutes traps air that makes the cookies soft and slightly puffy instead of flat and greasy. The egg binds the dough, the vanilla gives it flavor, and the baking powder gives it just enough lift that the cookies puff up in the oven and then settle into a soft, chewy center. The cornstarch in the dry ingredients is a small addition that makes a real difference: it keeps the cookies tender and helps them stay soft for days.
The crinkle coating works because the dough is cold when it goes into the oven. The outside heats up first and sets, while the inside keeps spreading, and the powdered sugar coating cracks as the cookie expands underneath it. If the dough is warm, the cookies spread too fast and the coating melts into the dough instead of cracking. That is why the chill matters, and why you should roll the balls in powdered sugar right before they go into the oven, not ahead of time.
Ingredients
- 1 cup (2 sticks) unsalted butter, softened
- 1 1/2 cups granulated sugar
- 2 large eggs, at room temperature
- 1 tablespoon vanilla extract
- Green food coloring gel
- 3 cups all-purpose flour, spooned and leveled
- 1 tablespoon cornstarch
- 1 teaspoon baking powder
- 1/2 teaspoon baking soda
- 1/2 teaspoon salt
- 1/2 cup powdered sugar, for rolling
- Red heart-shaped sprinkles, for decorating
A few notes on the ingredients: gel food coloring is essential here. Liquid coloring would need so much to get a vivid green that the dough would turn soft and sticky, and the color would still be pale. Gel gives you a bright, true green with just a few drops. Use real vanilla extract if you can — it is one of the main flavors in a sugar cookie. Measure the flour by spooning it into the cup and leveling it off; scooping from the bag packs in too much flour and makes dry, hard cookies. And use red heart sprinkles, not red round sprinkles — the heart is the whole point of the cookie, and a round sprinkle just looks like a dot.

How to Make It
- In a large bowl, beat the softened butter and granulated sugar together on medium speed for 2 to 3 minutes, until light, fluffy, and pale in color. Scrape down the sides of the bowl halfway through.
- Add the eggs one at a time, beating well after each one, then mix in the vanilla extract. Add green food coloring gel a few drops at a time, beating after each addition, until the dough reaches a bright, cheerful green. The color will lighten slightly as the flour goes in, so make it a little brighter than you think you need.
- In a separate bowl, whisk together the flour, cornstarch, baking powder, baking soda, and salt. Add the flour mixture to the butter mixture in two parts, mixing on low speed just until combined. Stop as soon as the flour disappears — overmixing makes tough cookies.
- Cover the bowl with plastic wrap and chill the dough in the fridge for 30 minutes. It should feel firm but still scoopable. If you chill it longer than an hour, let it sit at room temperature for 10 minutes before scooping.
- Heat your oven to 350 degrees F. Line two baking sheets with parchment paper. Put the powdered sugar in a small, shallow bowl.
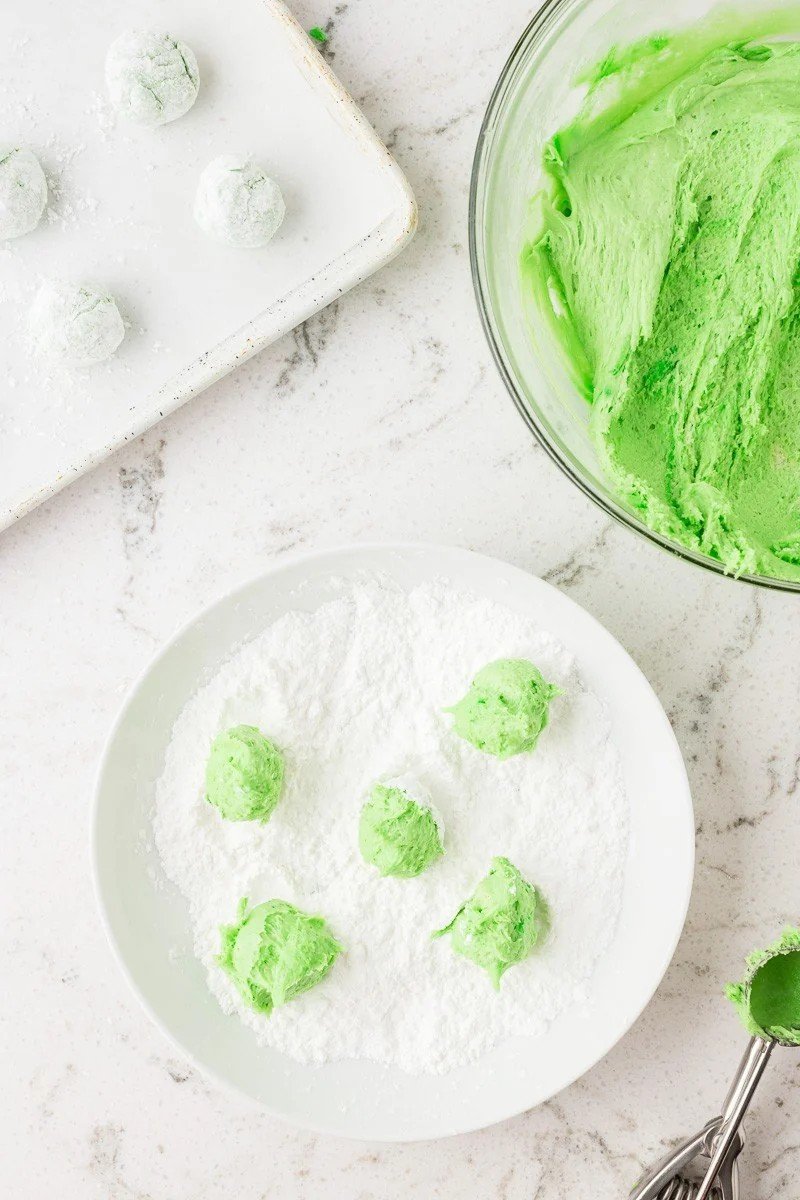
- Scoop the dough into balls about 1 1/2 tablespoons each, using a cookie scoop or a spoon. Roll each ball smooth between your palms, then roll it generously in the powdered sugar until it is fully coated. Place the balls 2 inches apart on the prepared baking sheets.
- Press one red heart sprinkle gently into the center of each ball. Do not press it too deep — it should sit on top of the dough so it stays visible after baking.
- Bake one sheet at a time for 10 to 12 minutes, until the edges are set and the tops are cracked and crinkled. The centers should still look slightly soft. They will firm up as they cool. If you bake two sheets at once, rotate them halfway through.
- Let the cookies cool on the baking sheet for 5 minutes, then move them to a wire rack to cool completely. The powdered sugar coating will look snowy and cracked, and the green will show through the cracks.
Tips for Success
Do not overbake these cookies. Pull them out when the edges are set and the centers still look a little soft — they finish baking on the hot pan. A cookie that looks done in the oven will be dry by the time it cools. Roll the dough balls in powdered sugar generously; a thin coating disappears into the dough, while a thick coating cracks beautifully. If the dough gets warm and sticky while you are rolling, put the bowl back in the fridge for 10 minutes. And use a cookie scoop if you have one, so the cookies bake evenly. Mixed sizes mean mixed baking times, and the small ones will burn while the large ones are still soft in the middle. Let the baking sheet cool between batches, or the dough will start melting the moment it touches the hot pan.
Variations
You can change these cookies without changing the dough much. For a mint version, add a quarter teaspoon of peppermint extract with the vanilla, and top with crushed candy canes instead of the heart. For a chocolate version, replace a third of a cup of the flour with cocoa powder and use white heart sprinkles. For a lemon version, add a tablespoon of lemon zest and skip the food coloring for a pale yellow cookie, or keep the green and add the zest for a Grinch lemonade flavor. You can also roll the dough balls in green sanding sugar instead of powdered sugar for a sparkly finish, though you will lose the crinkle effect. If you want larger cookies for a party, scoop 3 tablespoons of dough per cookie and bake for 12 to 14 minutes. And if you have leftover dough, freeze scooped balls on a baking sheet until solid, then store them in a freezer bag and bake straight from frozen, adding 2 minutes to the time.
Tips & Storage
Store the cookies in an airtight container at room temperature for up to 5 days. Put a slice of bread in the container if you like — the cookies absorb moisture from the bread and stay soft longer. They also freeze well: place the baked cookies in a freezer bag with parchment between layers and freeze for up to 2 months. Thaw at room temperature for 30 minutes before serving. The dough keeps in the fridge for up to 3 days, tightly covered, so you can bake a fresh batch whenever guests are coming. Serve them on a green platter with a bowl of red heart candies in the middle, or stack them in a cellophane bag with a red ribbon for a gift. They pair well with cold milk, hot cocoa, or a glass of eggnog, and they are sturdy enough to pack into a cookie tin for a swap without breaking.
Frequently Asked Questions
Why did my cookies not crinkle? The dough was probably too warm, or the powdered sugar coating was too thin. Chill the dough for a full 30 minutes, roll the balls generously in powdered sugar right before baking, and make sure the oven is fully preheated.
Can I use liquid food coloring? You can, but the color will be paler and the dough may get soft. Gel food coloring is much better for this recipe. If you only have liquid, add it a few drops at a time and chill the dough for an extra 15 minutes.
My cookies spread flat. What went wrong? The most common causes are butter that was too soft, dough that was not chilled, or too little flour. Use butter that holds its shape when pressed, chill the dough, and measure the flour by spooning it into the cup.
Can I make the dough ahead? Yes. The dough keeps in the fridge for up to 3 days. Let it sit at room temperature for 10 minutes before scooping so it is easier to handle.